Welcome to an 1864 farmhouse…life is good!


Friday, January 28, 2011

simple country pleasures...

This week I have found that a digital camera can only take so many accidental drops. I've cringed over the years as I've reached, as if in slow motion, to quickly catch it from crashing to the floor. Often I was successful, but many times it was simply out of reach and fell in the blink of an eye.

And so today's post is photoless...sad, but true.

I wanted to show you puffy marshmallows floating in a mug of chocolately cocoa.

I wanted to show you the cute cut-out marshmallows you can make using cookie cutters (hearts for Valentine's Day!)

Lastly, I wanted to show you that sweet chocolate "moustache" that magically appears on a child happily sipping away.

Alas, it was not to be. Some days are just better than others...
I think a cup of cocoa will make it all better. (That, and a visit to the camera store!)

So, with that long introduction, here you go...a Martha Stewart recipe I've used for years, and it's truly the best. They're so easy to make, and oh the taste...you'll never buy store-bought again!

Homemade Marshmallows

3 c. sugar
1-1/4 c. light corn syrup
1/4 t. salt
1-1/2 c. water, divided
4 env. unflavored gelatin
2 t. vanilla extract
1-1/2 c. powdered sugar

Lightly coat a 13"x9" baking pan with oil or non-stick cooking spray. Line it with parchment paper, leaving a 2-inch overhang along the edges. Coat parchment with oil; set aside. 

In a medium saucepan, combine sugar, corn syrup, salt, and 3/4 cup water. Over high heat, bring to a boil, stirring until sugar is dissolved. Continue to heat, without stirring, for 9 minutes, or until a candy thermometer measures 238 degrees.

Add  remaining water to the bowl of an electric mixer; sprinkle with gelatin. Let sit 5 minutes. Using whisk attachment, turn mixer to low and whisk hot syrup into gelatin mixture. Slowly increase speed to high and continue to whisk for 12 minutes, or until mixture is very stiff; beat in vanilla. Add mixture to prepared pan; smooth top. Set aside, uncovered, 3 hours, or until marshmallows are firm.

Dust one cup powdered sugar onto a work surface. Turn out marshmallow onto sugar; peel off  and discard parchment paper. Use a sharp knife or cookie cutters, coated with oil, to cut marshmallow into desired shapes. Toss cut-outs in remaining powdered sugar to coat. Store in an airtight container
for up to 3 days.

Tuesday, January 25, 2011

busy lives...

In a world that seems to spin faster each day, I've found it
helps me to slow down that pace a bit by enjoying some quiet, simple pleasures.

With winter's sub-zero nights (and even some days) here in the Midwest, I think about what country ladies who lived here long ago might have busied themselves doing this time of year.
They would have most certainly knitted, quilted, and mended during the long winters. A friend and I went to a yarn shop yesterday...she's teaching me to knit a shawl. Visiting the shop and seeing all the beautiful yarns inspired me to not only start (and finish!) my shawl, but to dust off my loom and complete a project that's been waiting on it for much too long.

When the kids come inside from snow-day fun, they warm up, then often settle in with board games, Go-Fish, or checkers. These games are a welcome break from the many electronic, and somewhat noisy, ones that seem to be everywhere.

Baking cookies or brownies, the aroma of a simmering stew,
or buttery homemade rolls are delicious ways to enjoy a wintry day. Handed-down recipes, handwritten on tattered index cards, hold special meaning, and it warms my heart to prepare them.

Hmmm, well my to-do list is still long, but I think for now I'll just sit a little closer to the fire and write some more. As I write,
the wind is whistling outside, but I'll pause now and then,
enjoy the warmth of the fire, and think about the country ladies who must have sat in this same spot over the last 147 years.

I'll also dream about how warm & cozy that new shawl is going to be...after all, anyone who's lived in an old house, knows that if the wind is whistling outside, some of it is sneaking inside!

Friday, January 21, 2011

a simple country pleasure...


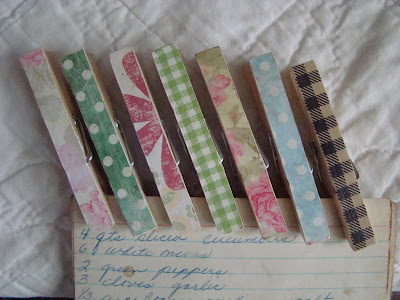
These pretty clothespins would certainly make our laundry look nice blowing in the warm breezes. However; they were made to stay inside...anywhere I would need a paperclip.

to secure recipes...


or even as a bookmark.


They're so simple to make. Just remove the spring between each section of clothespin. Now paint the clothespins, and set aside to dry before putting the spring back in place.

You can also cut scrapbook paper to fit each clothespin. A light coat of decoupage medium or a glue dot runner on the wood will keep the paper secure. Once dry, you can seal the paint or paper with decoupage medium if you'd like.

Oh-so easy! I've used them as chip-clips, to secure notes to our calendar, and to hold photos in place on a chicken-wire frame. You can even glue a small magnet on the back to show off  kids' masterpieces on the refrigerator.

Now, when spring comes, we'll certainly see lines filled with billowing clothes, but for now, these clothespins will be working hard indoors.

Tuesday, January 18, 2011

does anyone enjoy taking down the tree?

"Do you still have your tree up?!"

Ah yes...I've been greeted with this question many times
over the last couple of weeks.  Well, yes, we do still have our Christmas tree up, thank you!

It's a lovely tree, up since December 1. Very few needles have fallen, and it's still soft to the touch. It's  a Con Color Fir and I can't recommend them enough if you cut your own tree each year. I actually feel bad taking it down...Valentine ornaments, anyone? Then perhaps Easter ones?!

Something that's so much fun to decorate, is, for me, sad to undo. We carefully wrap the sentimental ornaments...baby footprints,
a honeymoon sand dollar, baby's first Christmas booties,
and countless handcrafted treasures the kids have made.

Hmmm, how to make it a less melancholy time? Well, there's a Dutch oven of chili simmering away on the stove, and soon homemade cornbread will be baked in a cast iron skillet. As we undecorate, we'll talk about each ornament, laugh as we share memories, and lovingly tuck each one in boxes we store in
a trunk.

The calendar for the new year is clean and just waiting for us to fill it. The house will be back in order and we can ponder the days to come. How much laughter, how many sweet memories, personal growth, and changes we fill 2011 with is up to us.

Let's look to the future with excitement, hope, and determination. And, as Laura Ingalls Wilder said, let us strive to be
"just plain good."

Friday, January 14, 2011

a gift for sharing...

Last Sunday a sweet lady at church gifted me with this...


just because she was thinking of me.

She had taken the time to crochet a cotton washcloth...
just for me, wrapped it around a bar of soap, and topped her gift off with a bow. What a kind and thoughtful surprise.
Such a simple country pleasure...yes, a little pampering for me, but also a handmade gift from the heart.

In a world where most items are made overseas, it made me pause and be grateful for someone who took the time to create something with her hands. And whether a friend shares a jar of sweet homemade jam, a hand-crafted Advent calendar,
or hand-stitched tea towel, there's just something that touches my heart when we receive such gifts.

So the wheels began turning. Why not share some similar ideas here each week? Simple country pleasures...heartfelt gifts to give (or keep!)

Maybe, like this washcloth, it's something I've received, or like the Mason jar oil lamp from last Friday, it's something quick & easy to make.

My plans are that each Friday I'll share an idea I hope will inspire you to create your own simple country pleasures. And please...
feel free to share your ideas as well!

Happy Friday!

Tuesday, January 11, 2011

January's simple joys...


...fill your pantry with cocoa, marshmallows, brownie &
  cookie-baking supplies

...make snow angels, build a snowman or go sledding,
   then come inside for homemade tomato soup
   and grilled cheese sandwiches

...watch old movies and stay in your pajamas all day

...force hyacinths, daffodils, or tulips and enjoy
   their fragrance in winter

...build a fire in the fireplace and roast marshmallows

...make snow ice cream or snow cones

...let your kids snuggle in bed with you
   on a snowy morning

...fill bird feeders to overflowing

...make "real" hot cocoa and top it with whipped cream
   and chocolate shavings

...put an extra quilt on the bed, then settle in with a favorite book

...make memories

Friday, January 07, 2011

Mason jar oil lamps...

Some days, there's just the need to be creative.
Now, if I admit to you that even though it's only January and I've been spring cleaning this week, you'll think I've gone mad.

A friend recently said, "It just doesn't seem right to be spring cleaning when there's snow outside!" And while she's right, when March does come, there's just so much to do outside, I can't find enough time for spring cleaning inside! That's why I take advantage of the quiet months of January and February to
jump-start my to-do list.

However; back to that creative tug. I've put my cleaning supplies away for the day and made a little Mason jar oil lamp. While the frosty days are here, I love lighting candles in the evening...they just seem to make our home so warm & cozy, and this oil lamp couldn't be easier to make!


The supplies you'll need are simple:

hammer and awl
canning jar lid and ring
wick
glass wick insert (found on-line or with candle making supplies)
rosehips, pine cones, or cinnamon sticks.
glass canning jar
clear lamp oil (not kerosene)

Use a hammer to tap the awl in the center of the jar lid. Make a hole large enough to fit the wick insert. Slip the wick through the glass wick insert and place it, wick first, into the hole. The lip on the insert will keep it secure on top of the lid.

Arrange rosehips, pine cones, or cinnamon sticks inside the jar, then fill to within 1/4-inch of the top with lamp oil. Secure the lid and ring. Trim the wick to 1/4-inch, trimming more if needed to keep the flame at a safe height.

I'll often place the jar inside a glass hurricane...it's not only pretty, but keeps little fingers away from the flame.

I hope you'll try making one...it's an easy, simple country pleasure for these wintry days.
 
01 09 10