Welcome to our 1864 farmhouse…life is good!


Wednesday, April 29

a vintage stove named Mae...


It's a cloudy Wednesday here on the farm...the kind of day that's good for old movies, favorite books, and an afternoon nap. My son will say this is his favorite kind of day, and I absolutely agree. It just seems like we take things a bit slower and enjoy them more.

So today's post is to introduce you to Mae...a 1950  Hotpoint stove. And I'm guessing you're probably thinking two things:

1- Who names their stove?

2- Sure vintage is cute, but is she practical, can she cook?


So, here's a little story of a stove named Mae.

A month ago, while going through a baking frenzy (who isn't these days?) and right in the middle of the kids' favorite Charlie Brownies, I noticed the heating element in our oven looked like a sparkler and a hot glow was traveling around the element. I turned the oven off. The traveling glow and sparks continued. So off went the breaker and I unplugged the stove. It stopped, and the oven stayed hot enough to finish baking the Charlie Brownies...a high priority. 

Now, I'd be less than honest if I didn't say that a little part of my heart skipped for joy...I've been wanting a double oven for some time now. If I'm going to be baking for my little farm market, two ovens are definitely better than one. So I began researching double ovens: which ones were rated the best and were any of those in stock locally? 

Then I had a brainstorm, being a devoted Susan Branch fan (read her blog...it's LOVELY) I began thinking, what about a vintage double oven?  Hmmm, I remembered she has one she loves, so I went back to her post about it...a 1956 O'Keefe and Merritt, "still going after almost sixty years in service."

And so I hopped online and began searching within a 50 mile radius. In no time at all I came across a 1950 Hotpoint for sale in "working condition" right here in my hometown. Come on, what are the chances?

Yep, she was cute, but that isn't enough...the bottom line would be, did she work?  So I decided to drop Susan Branch a note asking about her vintage oven, and she was kind enough to reply, even suggesting a shop that carried replacement parts if I would ever need them.

Okay...it's less than 15 minutes away, how can I not go? I set up a time to stop by and take a look. The kind family I talked with were the new owners of the house, and so an inspector had just given the oven a once-over...it all worked. At 39-inches wide she would just barely fit in my kitchen, but it didn't matter...she was coming home with me. Before we left, the homeowner asked me if I canned...I had a feeling she was hoping the stove was going to a good home. Yes, I told her...before I know it we'll be making jams, jellies, and canned tomato sauce.

Between the brawn of both my husband and son, she was up the steps, through the mudroom, and in place in no time at all.


I LOVE THIS STOVE. Two ovens, two broilers, and four burners that have in the last month baked endless batches of cookies, brownies, bread, along with Easter dinner and any other meal we could think of.


I LOVE how she's a pushbutton and the buttons change colors depending on the temperature...they're called "Talking Buttons"

.


Evidently she was quite the rage when these advertisements debuted!


  Amazon.com: Hotpoint Pushbutton Cooking Stove Kitchen 1950 Vintage Antique Advertisement: Prints: Posters & Prints


I LOVE that she has really deep pull out drawers that fit my extra pots, pans, and tea kettles. This is something that new double ovens don't have.


I LOVE that the repairman who just worked on our dryer took a look at her and said, "They don't make 'em like that anymore," and assured me he knew of a source for parts and that he could make repairs if I needed them. 

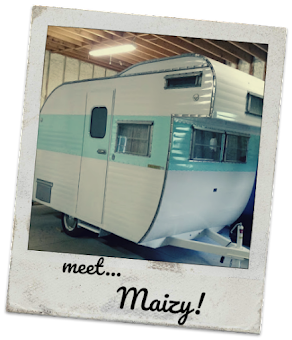
And her name? Well, my friend Lisa said anything vintage needs a name. And she's right, we named our camper, why not name a stove? I settled in and tried to get creative. Our camper is named Maizy, a name that's special because it's what my grandmother always called me...hmmm, her middle name was Mae. Why not Mae? 

I also needed a name for my little farm market, how about Maizy & Mae?  It felt like the perfect combination of my baking done in our vintage oven.


And so there you are...the story of Mae. A stove that is not only sweet to look at, but yes, so practical. And when I cook with her, I can't help but think that she's been bringing families together for 70 years...a very long time indeed. 


Monday, April 20

Dakota Bread...tried & true recipe


Happy Monday friends...in our corner of the Midwest the sky is a robin's egg blue and the sun is brilliant. This chilly April morning holds the promise of a beautiful day on the farm...just right for tiding up flowerbeds, cleaning out the garden, and maybe even a bonfire at nightfall.

Today I wanted to add a bread recipe that's a family favorite...shared by a dear friend years ago, we think it's wonderful. 


(I didn't have any sunflower kernels to top the loaf with, but it was still terrific!)


A combination of white, whole wheat, and rye flowers with added wheat germ,  honey, and oats it's hearty but still soft; just right for toasting or sandwiches. 


Dakota Bread

1 pkg. (2-1/4 t.) yeast
1/2 c. warm water, 110-115 degrees F.
1/2 c. cottage cheese
1/4 c. honey
1 egg
2 T. oil
1 t. salt
2-1/4 c. bread flour, divided
1/2 c. whole-wheat flour
1/4 c. wheat germ
1/4 c. rye flour
1/4 c. oats, uncooked
2  T. cornmeal
1 egg white, beaten
2 T. sunflower kernels

Combine yeast and water in a bowl; set aside 5 minutes or until foamy. In the bowl of a heavy-duty mixer; combine cottage cheese, honey, egg, oil, and salt. Beat at medium speed until blended; add yeast mixture and 2 cups of bread flour; blend again. Attach the dough hook and add whole-wheat flour, wheat germ, rye flour, and oats. Add enough of the remaining bread flour to make a soft dough that doesn't stick to the sides of the bowl.

Knead dough with a heavy-duty mixer for 6 minutes, or knead by hand on a lightly floured surface until smooth and elastic, about 10 minutes. Place dough in a greased bowl, turn to coat all sides, cover with a tea towel or oiled plastic wrap, then let rise one hour or until double in size. 

Punch dough down, shape into a round loaf, and place in a pie pan coated with non-stick vegetable spray and sprinkled with cornmeal. Cover and let dough rise again until double. Brush with egg white and sprinkle with sunflower kernels.  Bake at 350 degrees for 35 to 40 minutes. Cool on a wire rack. Serves 6 to 8.


Wednesday, April 15

bread recipes to share...


Happy Wednesday friends...this is an unusual spring for us all, and while I know we're all thinking of reunions with family & friends, that time isn't here just yet. Your daily commitment to stay safe, care for your family, and help others where you can are enormous blessings to all those around you. 

Moms...author/artist Susan Branch (find her delightful site here) has some inspiring thoughts for us (I'm recalling this from memory, so I apologize if I'm not spot on)


"You need to know that you are the fairies
that run ahead and make everything magical,
because you know that even the smallest of things can be special.
And you need to know that what you do is nothing short of heroic.

You are heroes without medals, 
and what you do matters more than anything."


Here's the thing...I know we're all trying to make everyday days special, and special days nothing short of extraordinary. There are birthdays, anniversaries, and holidays during this pandemic...and what matters most?  That we're giving our families warmth, a sense of wonder, dreams and the courage to believe in them, faith, and showing them what love really is.

Our family is together here on the farm, and like most families, both kids are taking their classes on-line and hubby is working from home. Me, well, I'm always working from home, so the routine is about the same...other than somehow each day feels like summer...there's no pre-dawn 4:30 alarm, no packing lunches, no running to & fro after school.
I've discovered that this new set-up does call for a little creativity and more food...yes, lots of cooking and eating going on here...not good for my waistline! 

Anyway, I know that so many of you are making your own bread now, I thought I'd repeat a few tried & true recipes...there's nothing like homemade bread, and paired with your favorite pasta, soup, or salad, you've got a terrific family meal.

Sending blessings to all of you...


Artisanal No-Knead Sourdough Bread 


Absolutely wonderful! Crispy, golden crust...soft and chewy inside, just what I wanted!
Warm out of the oven we topped it with butter and smiled...mmmm. 


So here's the recipe...and really, don't let the time to make it worry you. Just toss it together before bedtime, then finish it up after doing the breakfast dishes. It's perfect pairing with with a bowl of of warm-you-to-your-toes soup!


3-1/2 c. all-purpose flour
1/4 t. active dry yeast
1-3/4 t. salt
2/3 c. sourdough starter
1-1/2 c. water
1-1/2 T. cornmeal...for dusting


Whisk together flour, yeast, and salt in a large mixing bowl. Combine starter and water; add to flour mixture. Blend with a rubber spatula until thoroughly combined...mixture will be very sticky and wet.

Cover bowl with plastic wrap; set aside at room temperature for 12 to 18 hours. After at least 12 hours, dough should be dotted with bubbles and have doubled in size.

Turn out dough onto a surface lightly dusted with flour. Dust top of dough lightly with flour, cover with a cotton or linen tea towel, and set aside one to 2 hours.

About 30 minutes before the second rise is complete, place a round or oval 3-1/2 quart cast iron Dutch oven on the middle rack of oven; heat oven to 450 degrees. Once oven has reached desired temperature, carefully remove Dutch oven and sprinkle bottom with one tablespoon cornmeal.

Uncover dough and use a rubber spatula or two plastic dough scrapers, and fold dough over onto itself a few times; shape into a ball. Lift dough and drop into heated Dutch oven; dust lightly with remaining cornmeal. Bake bread, covered, for 35 minutes. Remove lid, rotate Dutch oven, and continue baking an additional 15 minutes, or until bread is golden.


Remove from oven, loosen loaf from Dutch oven and cool on a rack. Makes one loaf.


Farmhouse French Bread


2 c. warm water (110 to 115 degrees)
2 T. sugar
2 T. dry yeast
1 T. salt
2 T. oil
6 c. flour, divided
1 egg, beaten

Combine water, sugar, and yeast in a bowl; set aside 5 minutes, or until foamy. Pour mixture into the bowl of a heavy-duty mixer fitted with a dough hook. With mixer on lowest setting, add salt, oil, and 3 cups of flour; mix thoroughly. Add remaining flour; mix well. Let dough stand 10 minutes; mix again. Repeat this process, letting the dough stand 10 minutes, then mixing, 5 times.

Place dough on a lightly floured surface. Add only enough flour so that dough is easily handled; divide in half. Roll one half of dough into a 9"x12" rectangle. Beginning with the long side, roll up jelly roll-style. Moisten seam with a little water and pinch to seal. Repeat with remaining dough. Place loaves, seam-side down, on a well-oiled baking sheet; cover with a tea towel for
45 minutes.

Glaze loaves with beaten egg, then use a sharp knife to make 3 slashes across the top of each loaf. Bake at 375 degrees for 25 to 30 minutes. Makes 2 loaves.


Aggie's Homemade Bread


This recipe has become one of my all-time favorites. It's an easy, fuss-free way to have homemade bread in almost no time at all. The kids had a scheduled late start at school this morning, so I baked a loaf for breakfast. We all agree there's nothing like bread, warm from the oven, drizzled with butter and honey. Mmmm...

4-1/2 c. all-purpose flour, divided
1/4 c. sugar
1 T. salt
2, 1/4-oz. pkgs. dry yeast
1 c. water
1 c. milk
1/4 c. oil
1 egg, beaten

Sift together 2 cups flour, sugar, salt and yeast; set aside. Combine water, milk and oil in a saucepan over medium heat until mixture is 120 to 130 degrees. Using a heavy-duty mixer, combine flour mixture with warm water mixture; add egg. Blend on medium speed 3 minutes, then stir in remaining flour. Cover and let rise 50 minutes, or until double in size. Stir down; dough will be sticky. Spoon into a greased 9"x6" loaf pan. Bake at 350 degrees for 30 to 35 minutes.


Dutch Oven Bread


I won't spend any more time telling you how easy this is to make, or how your family & friends will think you picked it up at an artisan bakery, or how you will BEAM with pride when you serve it. What are you waiting for? Let's get going!

Ingredients:


3 c. all-purpose flour
2 t. salt
1 t. active dry yeast
1-1/2 c. water (110 to 115 degrees)

Whisk together the first three ingredients; add water and stir until a shaggy dough forms. Cover bowl with plastic wrap; set aside 8 hours.


When ready to bake, heat oven to 450 degrees, place a 6-quart Dutch oven, covered, into oven and set timer for 30 minutes.


Meanwhile, remove plastic wrap from dough, gently punch down and turn dough out onto a lightly floured sheet of parchment paper. Flour hands and shape dough into a ball; sprinkle top lightly with flour. Set aside while Dutch oven is heating...30 minutes.


Remove Dutch oven from oven, and using parchment, lift dough and place it, keeping parchment underneath, into the Dutch oven. Cover Dutch oven and bake 45 minutes; remove lid and bake an additional 10 to 15 minutes or until golden.  Remove from oven, lift loaf from Dutch oven and place on a rack to cool.


I'm not going to tell you to wait until it's cool to slice it...that would be silly. Wait until it's cool enough to carefully slice, then top with oodles of real butter. Yum! 


Sunday, April 5

our weekend...


Yesterday was a buzz of activity...a sunshiny day filled with the sounds of a rumbling mower, the fragrance of freshly-cut grass, and toe-tapping Glenn Miller tunes were filling the air while I weeded gardens and raked leaves. The kids stretched their legs by taking a walk down to a nearby horse farm and came back with this...awww, it warmed my heart. 


Compared to Saturday, today is a quiet day...the sky is cloudy with a drizzle of rain. It's a day that begs us to curl up, read, and be together. A day of rest that we all need.

Many years ago someone said to me, "Atmosphere is everything!"  And I laughed about it...really?  So many other things to be focused on...atmosphere? Well, she was a bit over-the-top, so I brushed it off and rolled my eyes,...atmosphere? Pshaw! 

Well, maybe she wasn't all wrong...lavish, over-the-top isn't my style, but through the years I have started to focus on the peaceful effect of atmosphere. So today, after chores and before kids were up, I started a fire, lit some candles, turned on classical music, and put an apple & cinnamon danish in the oven to bake. When everyone is awake, I want this old farmhouse to feel warm, cozy, safe.

It helps, during this time when we're all hunkered down, that we have room to roam, gardens to weed, acres to mow...it keeps the mind and body active. Of course kids are busy with schoolwork, but getting outside, hearing the birds sing, watching the farmers prepare for planting, and waving to neighbors is good for the heart.

For me, there is also comfort in the quiet shadows...either early or late. The sun rising on the start of a brand new day, or setting at the end of a day completed...


And here's a new shadow...
a 1950 Hotpoint stove.


You can call me crazy, but even THIS brings me comfort. Yep, she barely fits, and when I get a kitchen re-do some day, she'll be the happy centerpiece. When our oven quit last week, I was on the lookout for a double oven...while this wasn't what I had in mind, she was meant to be.  I'll tell you more in my next post.

A friend told me, just like vintage campers, vintage stoves need names too...hmmm, wonder what I'll be brainstorming today?  Any suggestions?!


01 09 10