Welcome to our 1864 farmhouse…life is good!


Thursday, April 28

throwback Thursday...Wacky Cake/War Cake

How the beautiful Eastern Bluebirds know when April has arrived is beyond me. These lovely, migratory birds always seem to return on schedule each year, and can now be seen flitting around the yard and busily building nests. Every so often I'll catch a quick blur of blue, and then before I know it, it's gone.


Photo Source: Here

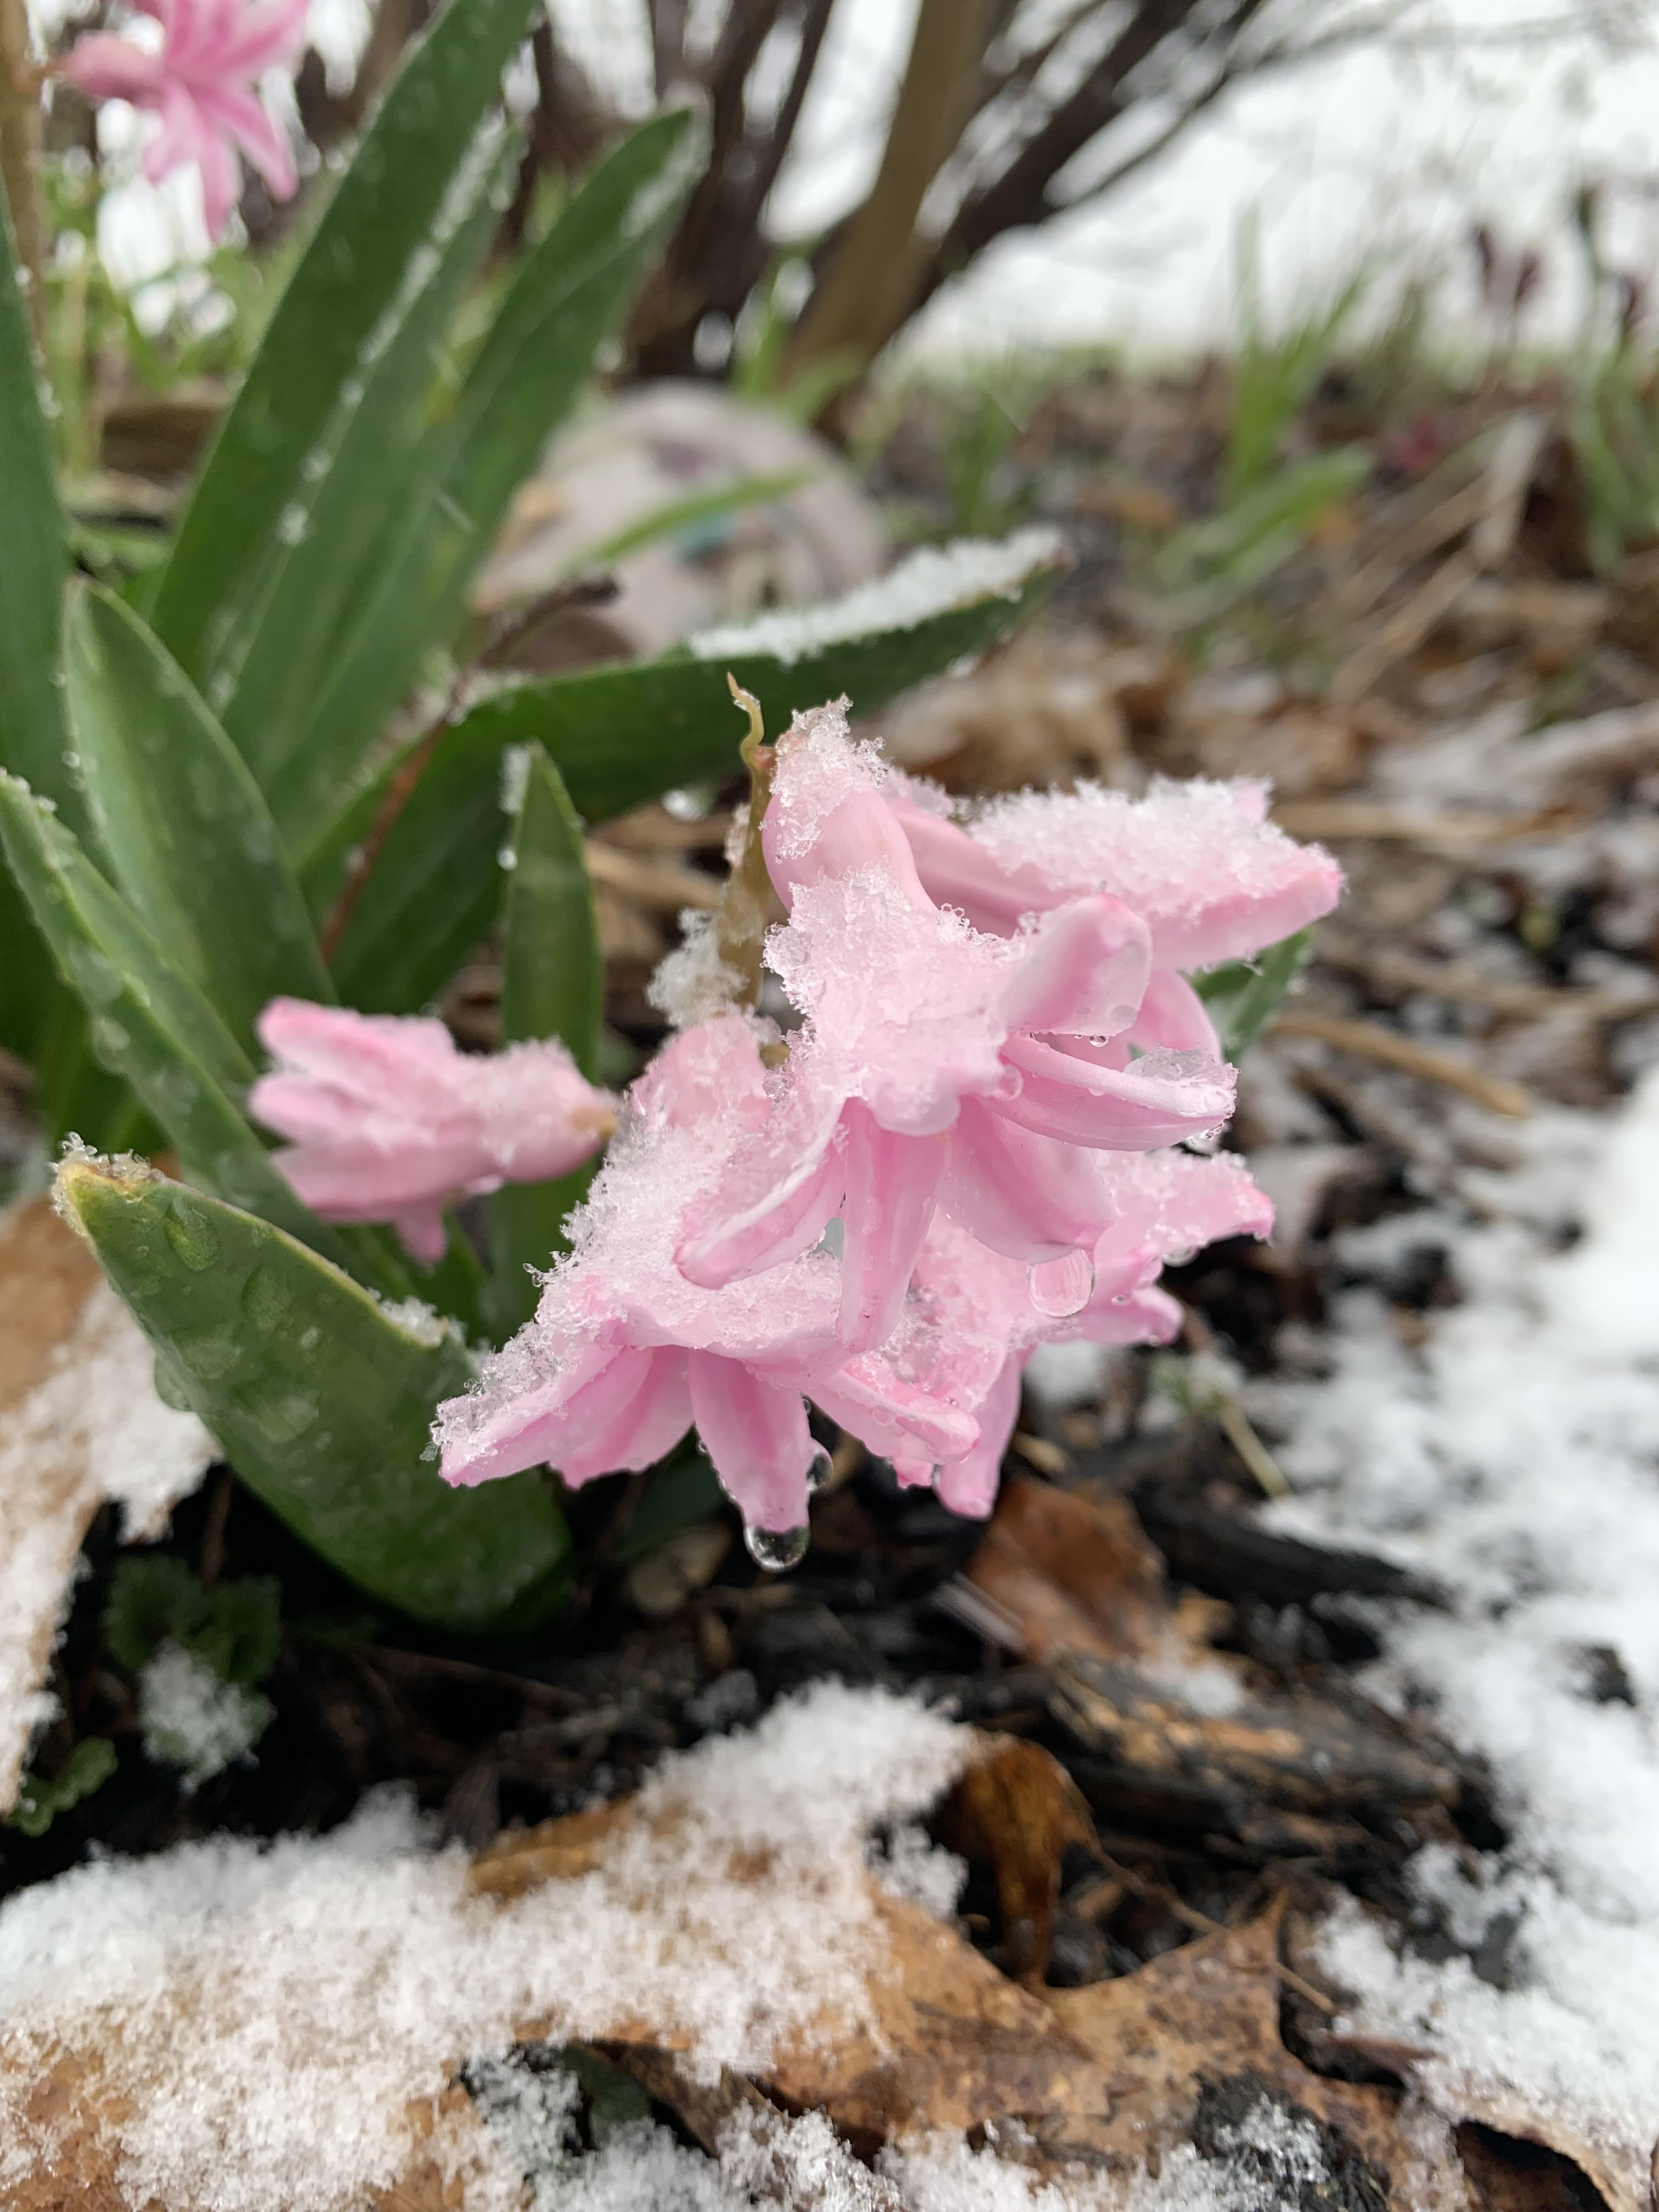
Here the weather is chilly again, dropping 50 degrees after a high of 83 degrees on Saturday...oh that Mother Nature! Still, there is beauty all around...wandering outside (bundled up today) the air is filled with the fragrance of golden-yellow daffodils, pretty pink magnolia and redwood blooms, and the tiniest lilac buds. Here & there tulips and hyacinths lift their heads and nod in the breeze. Later in the evening, we'll hear the peppers (small tree frogs) from a creek in the woods. Ahhh, April...simple and uncomplicated.


Today's throwback recipe is Wacky Cake or War Cake...a 1940's recipe.

It's my understanding that during the Second World War, when rationing of sugar and dairy was probably throwing all young housewives into a tizzy, this recipe was created. 

Made with no eggs, butter, or milk, it relies on the science of vinegar and baking soda to make the cake rise. Stirred together and baked all in the same pan, it couldn't be easier!


Wacky Cake - War Cake

1-1/2 c. all-purpose flour

1 c. sugar

4 T. unsweetened cocoa powder

1 t. baking soda

1/2 t. salt

1 T. white vinegar

1 t. vanilla extract

6 T. vegetable oil

1 c. water


Preheat oven to 350 degrees. In an ungreased* glass or ceramic 8-inch square pan (not metal), add first 5 ingredients; stir with a fork to combine.

Make three wells in the dry mixture, adding vinegar to one, vanilla to a second, and oil to the third. Pour water over all; mix with a fork until combined. Bake 25 to 30 minutes or until tests done in the center. Cool before frosting.


Frosting

1 c. butter, softened

2-1/2 c. powdered sugar

1 T. vanilla extract

Cream butter until smooth; stir in powdered sugar and vanilla. Continue to mix until smooth. Spread over cooled cake.


Changes:

*ungreased glass or ceramic baking pan

I lightly sprayed my ceramic baking dish with non-stick spray...while it may not have been necessary, I just felt it might stick if I didn't.


I have to say it tastes terrific! As a child of the "boxed cake mix" generation, this is so easy to make and has such a rich, chocolaty taste, I'll never go back to a  boxed mix again. I hope you'll give it a try...truly, it couldn't be easier!


Thursday, April 21

throwback Thursday...


Hi friends, today is short & sweet...I know you're all Spring Cleaning or digging in the dirt planning this year's garden (except for my friends in New Zealand who are welcoming Fall!) 

Oh, this weather...rain, chilly winds, surprise snowstorms. What's a girl to do? Well, days like this often mean a little bit of time enjoying a mug of herbal tea or hot chocolate, curled up in a shawl, reading a favorite book or magazine.

I don't buy magazines often (they seem to be more advertisements than actual articles) but this one was different...lovely photos and filled with inspiring garden ideas. And so I curled up in my new shawl (thanks Beverly at Bee Haven Acres - LOVE those jewel tones that match everything!) 


I'm always trying to find a perfect homemade hot chocolate recipe (if you have a favorite, please share) This one was found in an old recipe leaflet from about 50 years ago...if you like your cocoa thick, rich, and chocolaty, then this is for you (although with the butter and cream, maybe not every day!)


Homemade Hot Chocolate


1/2 c. semi-sweet or milk chocolate chips

1 t. butter

1/4 t. vanilla

1 cup half & half or cream


Combine chocolate and butter in a double boiler; heat until melted. Stir in vanilla and half & half or cream. Slowly heat; do not boil. 

Serves 1.


I didn't make any changes...and yes, it's thick and fills any chocolate craving! A spot on treat for a drizzly, gray day.


Wednesday, April 20

rain, snow, sun...repeat, plus that blue shelf!

April's spring-flowering bulbs are finally pushing their way up through the soil...cheery daffodils, fragrant hyacinths, flowering magnolia trees are now blooming across the countryside and we can see there's a definite start to spring.

However; in an instant, a spring snow can fall and cover all those blooms with an icy glaze.


But in April, snows like this don't last long, and even though we're still getting an icy wind from the North, predictions are for a temperature of 80 degrees Saturday. For me, that's a little too hot...I hope it's not an indicator of a hot and humid (translation: miserable) summer to come!

As some of you may have read, I've been eyeing an old blue shelf that's been hanging in our barn for ages...it was here when we moved in. And with the help of my blogging friend Jance at Prims by the Water...a CupboardScape creator extraordinaire, and lots of suggestions from her readers, I was determined to bring that old blue shelf back to life!

I'm guessing it's as old as the barn (there was a 1959 Official State Yields catalog from Dekalb in a drawer) so down from the wall it came. I gently brushed off the dust & cobwebs and I rubbed on a light layer of Feed N Wax. 

While not as dark as the photos make it look (the foyer doesn't have a lot of light) the wax did darken the blue color...but it was so dry and flaky, I felt like I needed to give it a little protection. I'm hoping as the wax sinks in over time, it will lighten back up a bit. 

I placed the shelf on on a table in the foyer, and then I tinkered, and tinkered, and then tinkered some more with what to set on top. And so, here's the (probably not) final result:


Some little  gadgets were hanging on it,
so I brought those inside as well.


I've had this table runner for ages
but never found just the right spot
for it...this seemed like a good match to me.

Whoever "A" is, he seems to have lost his
drawer pull along the way...


while "F" still has his intact!


On the left I placed a milking stool that
belonged to my husband's grandfather,
and in front, is a photo from his grandmother.  

A flickering battery candle is tucked in an
old Mason jar I had in the cupboard.
The lime/orange garland I had planned
just seemed too fussy for this simple shelf,
so I bought a rosehip & nutmeg one instead.


Trying to add more family pieces,
the shelf is sitting on a length of barn wood 
from my father-in-law's barn. 


I tucked little pillows
(there's that "pop" of red again)
in a rusty egg basket, and put some
hyacinths in an old crock
(they make the downstairs smell wonderful)


And there you have it...I'm looking forward to changing it up with the seasons. Flags for summertime, pumpkins for fall, and greenery with Santa for winter.

Heartfelt thanks again to Janice for taking the time to stage so many wonderful options for me, and to her friends for sharing their suggestions! I love it and feel like I have a brand new piece of furniture.

A final thought...

I can't help but wonder what the 1959 farmer (or better yet, his wife!) would think about bringing that old barn shelf into the house!


Friday, April 15

happy Easter!


Wishing you a happy Easter ...
filled not only with chocolate bunnies and jelly beans,


but with peace and hope.

Wednesday, April 13

a "pop" of red...

I thought I would skip Throwback Thursday this week because I'm sure you have your own favorite family recipes that you'll be making for the holiday weekend. While I know some are closely guarded secrets, if you can, why not share a tried & true recipe in one of your posts?
It would be terrific to try a handed-down recipe that's a must-have for you!

In-between bursts of Spring Cleaning, I'm working on the shelves I brought in from the barn. I've arranged and then rearranged, but I think I'm almost ready to share the final display. 

I really didn't want to buy anything new, so I've been pulling out lots of things I had tucked away trying to find a combination that looks "just right." The last thing to do is make a garland to hang across the front. At Christmastime I bought some dried orange slices, a dried lime, and some other garland goodies to pair with the whole nuts and bay leaves I already have in the cupboard. Soon I'll string them together and see what I can create.

If you're wondering about today's post title...as I worked on the barn shelves, I kept thinking,
"It needs a pop of red." And then I noticed that in most rooms, I have what I'd call a "pop" of red among the darker colors that I like...black, navy, cranberry, hunter green, or mustard. Not a lot of red, just a little something, that well, pops!  Here's a look at some of those little bits...


pillows tucked in a box on the wall


quilt on a trunk holding Christmas ornaments
(Does anyone know the pattern name?
It has only 4 squares of yellow,
all of the others are white.)


striped fabric hanging over a pie safe


a 9-patch quilt on a trunk
filled with baskets


I bought this for a song at a nearby shop
(I think because the owner knew it was
my birthday, so sweet!)
Not sure of the pattern,
maybe Carolina Lilly?

tucked into a small, vintage egg basket,
I believe this pattern is called
Cake Stand & Basket


given to me by my mother-in-law...
does anyone know the pattern name?


Santa stays out all year to help me
try and remember Christmas 
(my son found the heart-shaped rock!)


old books wrapped with a strip
of discarded fabric 


And so there is my little bit of red.

I remember hearing that there should be something in every room that makes you smile...what makes YOU smile?!


Wednesday, April 6

throwback Thursday...bread & butter pickles

Maybe it's just me, but I think Mother Nature is enjoying a little April Foolery. 

Hmmm, do you see any funny business going on?


snow...


rain...


ice...


While I like to think of April as a rather flowery, showery month, so far, it's been a whirlwind of anything goes. Oh well, I have plenty to keep me out of trouble inside, no need to worry about what needs doing outside...that time will come soon enough.

I've been working on a shelf I brought in from the barn...I'd say built in the 1950's, a little worse for the wear, but I just felt that it needed a home indoors. I've gently brushed out oodles of dirt & dust, wiped it down, and added a light protective coat of beeswax. When it's "just right" I'll share some pictures. For now, I'm still tinkering, as the saying goes. Speaking of "tinkering" just for fun I looked up a definition...this made me laugh:


"To attempt to repair or improve something 
in a casual or desultory way,
often to no useful effect."


"...no useful effect." Hmmm, well some may agree, the jury is still out on that!


Today's Throwback Thursday...
the recipe for my grandmother's
Bread & Butter Pickles. I've had this recipe for ages, so last summer I decided it was time to make them.

I'm so glad I did...they tasted just like I remember my grandmother's pickles tasting. I lived with my grandmother until I was 10, and while I was making these pickles, I loved knowing it was her handed-down recipe in her own handwriting.

Now a word of caution: if you've never used a water bath canner or prepared foods for pickling, read all that you can (I'll provide some links below) before you begin. It's of the utmost importance that care be taken to ensure preserved food is completely safe.

NOTE: This recipe is shared exactly as it was written decades ago; however I've given notes below it: some are changes I made for personal preference, the remainder are specifics I use for safe water bath canning.


Maymie Mae's Bread & Butter Pickles

4 qts. cucumbers, thinly sliced, ends discarded*
6 white onions, thinly sliced
2 green peppers, seeded and thinly sliced
3 cloves garlic, peeled
1/3 c. coarse medium salt*
5  c . sugar
1-1/2 t. turmeric
1-1/2 t. celery seed
3 T. mustard seed
3 c. cider vinegar

In a very large bowl, combine cucumbers, onions, peppers and whole garlic cloves. Add salt and mix with ingredients; cover with cracked ice. Let stand 3 hours; drain thoroughly.

Combine remaining ingredients and pour over cucumber mixture. Heat to a boil. Seal in hot sterilized jars.**


* 4 qts. cucumbers, thinly sliced

you'll need about 2 lbs. per quart, so depending on the size of your pickling cucumbers (about 4-inches on average) you may need 8-10 lbs.

 * 1/3 c. coarse  medium salt
I used pickling salt


** at this point I give more clarification as to what steps I took, but it's still important to review the links below for detailed instructions on preserving foods.


I placed my drained, rinsed cucumber mixture in my large Power Cooker, added the vinegar mixture and let cook until it came to a boil, then boiled 5 minutes.

I carefully ladled the hot pickle mixture into hot pint jars, leaving 1/2-inch headspace. I removed air bubbles by inserting a flat spatula into each jar and slowly moving around the jar edge. Jar rims were wiped clean, sterilized lids added, then sterilized rings secured to "fingertip tight."

I placed each jar into the rack of a water bath canner, lowered it into the simmering water until jars were completely covered with water. I let the water come to a boil and processed for 15 minutes. The canner rack was carefully lifted from canner, jars were gently removed and set aside on a heat-proof surface to cool. I then listen for each jar lid to "ping" (just like I did as a kid!) meaning the lid has sealed to the jar properly.

Yield: about 14 pints


Canning Links:


I hope you'll give this recipe a try, or better yet, grab a girlfriend and make it together!


Sunday, April 3

April 4 - World Stray Animal Day!


A Chinese proverb says: 

"To be followed home by a stray dog is a sign of impending wealth."


art credit: www.maryengelbreit.com/


While I've never been lucky enough to have a dog follow me home, they do; however, just appear...or rather are found, snoozing in the barn. Over the years there have been oodles of cats find their way here, but only 4 dogs. 

Our first gem was an Airedale mix named Mad Dog (absolutely no reflection on his personality...just a name taken from Marvel's Mad Dog Comics and the Bob Newhart show, Bob) He was amazingly friendly and a hit with the neighbors.

Our second dog was Sam...fluffy and golden, a bit shy, but sweetly protective of us. Wishbone was the third...a bouncy Jack Russel mix named after the famous PBS kids show dog, Wishbone

These days I count myself lucky to curl up with Bailey...a Staffordshire Bull Terrier mix who is an absolute sweetheart. You can read the story of how she came to the farm here


Sadly, there are a lot of stigmas that surround Bull Dog breeds. But aren't all dogs products of their environment as well as genetics?  It made my heart happy when recently a lady exclaimed,
"What a gorgeous dog!" while a few days earlier our mailman had said, "What a beauty!" 

Here's the thing: whether it's a Staffordshire Bull Terrier, American Pit Bull Terrier, or American Staffordshire Terrier, I think of them as cousins with the same Grandfather: the Bull Dog. Yes, she's very muscular and may look imposing (which is not a bad thing when it's just me on the farm), but ferocious? Aggressive? Not at all...Bailey is an incredibly gentle, intelligent, and affectionate soul. Never has she growled or snapped, she's absolutely patient, and a loving companion. Truly, she seems grateful to be warm, fed, and loved. As they say: Who rescued who?

And so, as we celebrate World Stray Animals Day, I'll share a heartfelt quote from a well-known actor - it's certainly reached more readers and will have more influence than I possibly could from my little corner of the Midwest:


"There are many loving animals at shelters
who are in desperate need of a home.
Visit a shelter and leave with a best friend."

-Chris Evans
Link


01 09 10